Showing posts with label style. Show all posts

20.3.14

MY ETSY STORE SALES !

Year 2014 already.

It's been way toooo long since I last posted. 

anyway!

i'm having a large sales for all my pieces from previous collection! 50% off from original price! 


maxi asymmetrical draped black dress with front pocket 


 charcoal knit sleeveless drape pleat-waisted dress


black gingham sleeveless pleat-waisted dress


unique tops, bottoms and dresses all handmade with lots of passion. 
and free-size!


If you are interested please visit my online store 

=) =)


28.6.13

D.I.Y ~ project two ~

and the weather is definitely chilling.

it's officially winter! 


another transformation today;

just
a way to freshen your wardrobe !
 
this is an incredible easy project to make yourself something out of worn clothes that you just got tired and feel uninspiring wearing them.

or modifying some boring basics to something trendy this season because you wouldn't want to spend that heavily buying it out from the store...

and yes that's because you know you could replica something similar easily with only a few dollars. 

and it's so much fun to use your creativity.


【project 2】


a worn out v neckline sweater

and turn it into ...


         studded elbow patched sweater


let's get started!


: a brief-how-to :

 the first few steps would be very similar to the previous diy.

1. wear your sweater. make a mark using chalk, pin or marker on where you would like your elbow patch to be in front of the mirror.

2. then you need to decide if you like your neckline (ha!)if not, draw your desired neckline - whether if it's just a little trim or chop off. my sweater has a v-neckline and i just don't wear v neck that much so i am going to chop it off to something like a crew neck.


3. lay the shirt flat on the table and decide on how large you want your patches to be. you can draw the desire shape on a paper (i just use newspaper) and briefly put in on the shirt so you get an idea how it would look like. i wanted to go for an oblong shape this time so i cut out a square around 13cmX13cm from the paper then fold it in half and draw a curve line around the edge. cut along the curve line and you have your pattern ready.

4. lay your cut-out papers on any remnants (i suggest other kind of knits or denim so you don't have to worry about doing the finishes or any fraying issue) and cut them out. i had utilized my left-over cut out jeans from my old d.i.y again.

5. pin the patches in place and stitch the patches on using machine or hand-stitch it firmly. and you are done with the patches!

6. let's go along with the studs. lay your sweater flat and decide where you want the studs to be. play around until you are satisfied. i kept mine symmetrical and just alternating in height. once you are done, use a chalk or pen to mark where the studs are going to sit. please refer to my old diy to learn how to stud.

7. DONE and ready to be worn! YAH!


before and after


d.i.y outfit look  ♡

i made this quite a while ago and have been wearing it a few times but never got to take a proper photo of it, so i apologize for the poor images.


in vain

23.5.13

D.I.Y ~ project one ~

so.

was doing some wardrobe cleaning the other day (and that was like three months ago)
trashing some old unwanted clothes for donation.

and it was quite a big bag.

there were in fact a lot of ragged sweaters and shirts from my partner and so i decided to take them all and perhaps use them wisely instead ; aha.

d.i.y is just like giving another chance of life to these poor babies.

and finally.
last week i took them out from the cupboard where i kept them well before i decided to do some choppin'.

the weather has been turning really chilly and i wonder where has my autumn gone instead. and it is a good timing to transform them so i could wear for the cold days


【project 1】

men's long t-shirt


  an old basic t-shirts ...


customizing into


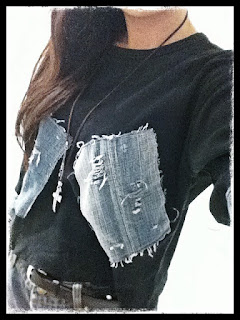
funky denim cut-outs cropped top !


: a brief-how-to :

1. put the shirt on in front of the mirror and make a mark using chalk, pin or marker on desired length (for cropped look). alternatively you can just fold and carefully take off the shirt so you don't lose the fold !  i did not add any extra length for finishes as i always preferred raw edges. 

2. do not take the shirt off ! you need to decide where you want to put the sleeve-patches on. just choose where you would love it to sit. in my case, i decided on the elbow. mark it.
 
3. lay the shirt flat on the table and cut off the extra hem. then, decide on how large you want your patches to be. you can draw the desire shape on a paper (i just use newspaper) and briefly put in on the shirt so you get an idea how it would look like. i cut out two 14cmX18cm for the front and two 7cmX31cm for the elbow. 

you don't have to follow mine since every shirt is different. a tip for the elbow patch is to measure the width of the sleeves + 2cm for seams.

4. lay your cut-out papers on any remnants (i strongly suggest knits or denim so you don't have to worry about doing the finishes or fraying issue) and cut them out. i had utilized my left-over cut out jeans and ripped them for the torn look.

4. once you decide on where they are going to sit, pin it and stitch the patches on using machine or hand-stitch it firmly. and you are done !


before and after


d.i.y outfit look  ♡

pairing with
⇒ d.i.y denim shorts (see how i transform a similar one here)
⇒ d.i.y cross necklace